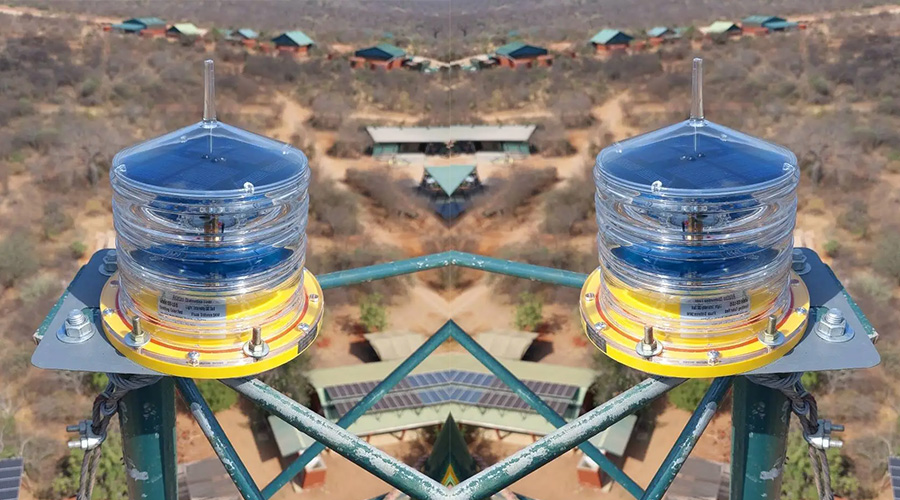
Low-intensity aviation obstruction lights are primarily used to identify obstacles such as buildings and towers, alerting aircraft. Typically, they emit a steady red light at night or in low-visibility conditions to ensure aviation safety. Therefore, their proper operation requires routine maintenance. Let’s discuss how to properly maintain aviation obstruction warning lights.
How to Maintain Low-intensity Aviation Obstruction Lights?
I. Maintenance Objectives & Prerequisites
- Objective: Ensure that aircraft warning lights illuminate reliably in all visible and invisible conditions, achieving the specified brightness, color, and usability.
- Prerequisite: Comply with national/regional civil aviation regulations for aviation obstacle warning lights and the manufacturer’s technical manual.
II. Daily Inspection Points
Appearance Inspection:
- No cracks or obvious deformation, and the protective cover is intact.
- The fixing bolts and brackets of the low-intensity obstruction light are not loose.
Electrical Connections:
- The wiring terminals are free of corrosion and looseness.
- The cable sheath is intact, and the insulation is intact.
Power Supply & Grounding:
- The power supply voltage is within the rated range and the power supply is stable.
- The grounding is good, with no abnormal current or overheating.
Luminous Efficiency Inspection:
- Observe whether the lamp head is emitting light and whether the color meets specifications (e.g., red/white, etc.).
- Flickering, color cast, and insufficient brightness should be recorded and investigated.
III. Maintenance Cycle and Schedule
Routine Inspection: It is recommended to conduct a brief inspection at least once a month and keep records.
Functional Testing:
- Daily/weekly automatic testing (if equipped with a self-test function) is performed to verify the self-test results. Full functional testing and performance verification is performed quarterly/semi-annually.
- Annual Maintenance: Comprehensively inspect and clean the entire low-intensity aviation obstruction lights, replace deteriorating components, and compare performance to a baseline.
IV. Specific Maintenance Steps
1. Power Off & Safety
Before beginning maintenance, ensure that the low-intensity lamp is powered off and implement on-site safety measures.
2. Cleaning the Lamp Head and Housing
Use a soft cloth and a small amount of neutral detergent to clean the exterior and light-transmitting surfaces, avoiding scratches. Cleaning the protective cover can improve luminous flux.
3. Check the Light Source and Lens
Verify the bulb/LED is in good condition. If it shows obvious signs of aging, blackening, or decreased brightness, replace it according to the manufacturer’s specifications.
4. Check the Windings and Driver Unit
Check the operating condition of the power module, driver chip, and voltage stabilization/rectifier components against specifications. Replace any abnormalities.
5. Sealing and Protection Rating
Check the seals and protective covers for integrity and ensure the water and dustproof rating (e.g., IP64, IP65, etc.) has not been compromised.
6. Testing and Calibration
Perform on-site measurements of light intensity and color to ensure compliance with specifications for brightness and color temperature/color.
If the light has a dimmable or wing-shaped design, calibrate it to the rated parameters as specified.
7. Recording and Traceability
Record inspection results, replacement parts, and test data in a maintenance log for easy traceability.
V. Possible Common Problems & Solutions
- Significant brightness reduction: Check the light source life, drive current, and lens contamination. Replace the light source or clean the lens if necessary.
- Abnormal flickering/color shift: Check for issues with the driver power supply, loose signal cables, or poor connection, and any interference sources.
- Day or night self-test failure: Check the self-test circuit, backup power supply, and communication interface, and refer to the manufacturer’s fault code for diagnosis.
- Deterioration of structural components/water intrusion: Check seals, port waterproofing, and other components, and reseal or replace waterproofing components as necessary.
VI. Replacement Parts & Procurement Recommendations
- Prioritize the use of our low-intensity aviation obstruction lights integrated devices or certified and verified high-quality replacement parts to ensure electrical compatibility and protection levels.
- Record component batches, expiration dates, and warranty information to avoid recurring failures.
VII. Compliance & Documentation
- Comply with regulations: All aviation obstruction lights must comply with the maintenance procedures, intervals, and testing methods specified by the Civil Aviation Administration (CAAC), aviation regulatory agencies, and the manufacturer.
- Maintenance Log: Detailed records include inspection results, replaced parts, test data, personnel signatures, and dates.
- Training & Qualifications: Maintenance personnel must possess appropriate qualifications and training and be familiar with field safety and height-related work procedures.